Curing concrete in the winter and cold temperature is fast and easy using Ground Heaters. Need more information? Call 888-612-HEAT(4328) or email us.
Principles of Concrete Curing
Concrete does not dry; it cures. This is a chemical reaction that puts out heat, especially during the first day. The warmer the concrete the faster it cures. When it is frozen or is very cold, it stops curing altogether.
Concrete goes through several stages during it’s use.
- It comes to the site in a liquid or plastic form when it can be placed, consolidated, screeded and bull floated.
- After an initial set (6-8 hours at 60-70°F) it can be finished through floating, and troweling or brooming.
- Final set is usually another 6 hours at 70°F. It is now hard, but far from fully cured. It continues to cure and gain strength as time goes on, so long as it is warm enough.
- After 6 or 7 days at 65-70°F concrete has generally achieved 75% of its design strength. At this point forms can be stripped and loads applied.
- After 28 days concrete has achieved its design strength, although it will continue to cure
and gain strength for up to a year.
Conditions needed for a good cure.
Moisture
- The concrete curing process uses up water, therefore it must have moisture to continue curing. If concrete gets too hot, the moisture will evaporate and it will stop curing.
- This is why we don’t run the Heater at 180°F during curing.
A temperature of 65-80°F
- The lower the temperature, the slower the cure. This wastes time on the project. There is also a risk of freezing. If concrete freezes before the final set (about 12 hours at 70°F) it may have to be removed. If concrete freezes after the initial set, it will stop curing.
- With the Heater you can protect the concrete from freezing, and maintain the correct temperature to keep the concrete curing.
Goals of Concrete Curing
The goals in concrete curing in cold conditions are:
- Don’t let the concrete freeze.
- Keep the concrete above 65°F so that it cures properly and quickly.
- Keep the concrete below 80°F so that it won’t bake and loose moisture.
SLAB ON GRADE BELOW 25°F(hose is reused)
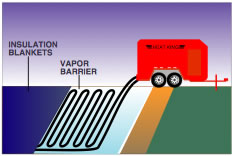


Prepare the ground for concrete.
Place rebar.
Preheat the ground, run Heater at 180°F, place hoses at 24" centers, put on insulating blankets and let the ground heat to at least 85°F.
Remove insulating blankets and rewind the hoses
Turn the Heater down to 85°F
Bring in the concrete at 75°F
Place 75°F concrete
As soon as the concrete has reached the
final set put on a vapor barrier.
Place hoses at no more than 20" centers, if you have extra hose use it. The more hose that you use, the more even the heat.
Place R 15 of insulating blankets.
Monitor the return temperature on the Heater. Adjust the Heater until the return temperature is in the 65 - 75°F range.
Keep the heat on until the desired design strength has been achieved (this will not be less than 7 days)
This is a general guideline, have your structural or civil engineer approve your plan.
SLAB ON GRADE BELOW 25°F(hose abandoned)


Prepare the ground for concrete.
Place hoses at 20" centers.
Start preheating the ground, run Heater at 180°F.
Place rebar above hose.
Put on insulating blankets and let the ground heat to at least 85°F.
Remove the insulating blankets
Turn the Heater down to 85°F
Bring in the concrete at 75°F
Place 75°F concrete on top of hoses.
As soon as the concrete has reached the final set put on a vapor barrier and R 15 insulating blankets.
Monitor the return temperature on the Heater. Adjust the Heater until the return temperature is in the 65 - 75°F range.
Keep the heat on until the desired design strength has been achieved. (This will not be less than 7 days)
You can now use the system as a temporary radiant floor heating system until the permanent heating system is in place. Do not run the Heater above 85°F until the concrete is fully cured.
This is a general guideline, have your structural or civil engineer approve your plan.
WALLS UP TO 10" THICK
Grade Beams and Walls (below 10°F hose abandoned)

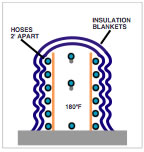


Run hose at bottom of wall in the middle of the forms.
Run another hose through the wall for every 4' of height or
portion thereof.
Run a hose near the top of the wall.
Run hoses on outsides of form at bottom, and every 2' up
the forms. (both sides)
Put at least R 15 of insulating blankets over forms.
Run the Heater at 180°F to preheat forms and rebar for
at least 3 hours.
Remove the insulating blankets.
Turn the Heater down to 85°F
Pour 75°F concrete.
Replace vapor barrier, insulating blankets and wrap tight
Monitor the return temperature on the Heater.
Adjust the Heater until the return temperature is in the
65 - 75°F range.
Keep the heat on until the desired design strength has been
achieved. (This will not be less than 7 days)
This is a general guideline, have your structural or civil
engineer approve your plan.
WALLS 10"- 24" THICK
Grade Beams and Walls above 10°F (hose is reused)


Run hoses on outsides of form at bottom, and every 2' up
the forms. (both sides)
Put at least R 15 of insulating blankets over forms.
Run the Heater at 180°F to preheat forms and rebar for
at least 3 hours.
Remove the insulating blankets.
Turn the Heater down to 100°F.
Pour 75°F concrete.
Cover the forms with a vapor barrier, insulating blankets and
wrap tight. It is important that there is an air tight, well
insulated envelope around the forms.
Monitor the return temperature on the Heater.
Adjust the Heater until the return temperature is in the
65 - 75°F range.
Keep the heat on until the desired design strength has been
achieved. (This will not be less than 7 days)
This is a general guideline, have your structural or civil
engineer approve your plan.
WALLS 10"- 24" THICK
Grade Beams and Walls below 10°F (hose abandoned)


Run 2 hoses at bottom of wall in forms within 2" of form.
Run another 2 hoses through the wall for every 4' of height
or portion thereof.
Run 2 hoses near the top of the wall within 2" of form 4'.
Run hoses on outsides of form at bottom, and every 2' up the forms. (both sides)
Put at least R 15 of insulating blankets over forms.
Run the Heater at 180°F to preheat forms and rebar for
at least 3 hours.
Remove the insulating blankets.
Turn the Heater down to 85°F.
Pour 75°F concrete.
Place vapor barrier, replace insulating blankets and wrap tight.
Monitor the return temperature on the Heater.
Adjust the Heater until the return temperature is in the 65 - 75°F range.
Keep the heat on until the desired design strength has been
achieved. (This will not be less than 7 days)
This is a general guideline, have your structural or civil engineer approve your plan.
Have questions? Call 888-612-HEAT(4328) or email us anytime.